Quick answer
Installing a heavy-duty fan guard in your K9 vehicle is a simple 20-minute job that protects your dog from injury and keeps the vehicle's cooling fan from being blocked or damaged.
Why a Dedicated Fan Guard Matters
Standard wire grills or homemade solutions often leave large openings or flex under pressure, creating a pinch hazard for your dog. A heavy-duty steel fan guard prevents this by providing solid coverage with balanced vent holes that allow plenty of airflow while keeping paws, noses, and tails away from the fan blades.
The AceK9 Heavy-Duty Fan Guard is designed to fit 10-inch and 12-inch fans commonly used in K9 vehicles. Its one-piece construction and black powder-coated finish resist corrosion and rattling on rough roads.
Installation Steps
- Gather Tools and Inspect the Fan Guard: You'll need a Phillips-head screwdriver, a socket set or nut driver (typically 10 mm), and the fan guard. Check the AceK9 guard for any shipping damage and confirm it fits your fan's diameter (10 or 12 inches). Most installation failures happen because the guard is not centered on the fan before tightening. Dry-fit first.
- Unplug the Fan or Disconnect the Battery: Before working near the fan, unplug it from its power harness or disconnect the vehicle battery. This prevents accidental blade rotation while you handle the guard, reducing the risk of cuts or pinched fingers. If you skip this step and the fan kicks on, the guard can spin with the blade and cause injury.
- Position the Fan Guard Over the Fan Shroud: Place the guard directly over the fan housing or shroud, aligning the mounting holes with the fan's frame. The AceK9 guard's balanced vent holes should face outward, not be blocked by the shroud. If you can wiggle the guard more than 1/8 inch after tightening, it's not secure — use additional washers or re-drill holes if necessary.
- Secure the Guard with the Provided Hardware: Insert the bolts through the guard's mounting holes and into the fan frame. Tighten the nuts evenly in a crisscross pattern using a socket or nut driver. Do not overtighten to the point of stripping the plastic shroud. Plastic fan shrouds crack easily. Stop tightening as soon as the guard is snug — the fan guard does not need to support vehicle weight.
- Reconnect Power and Test Airflow: After all bolts are tightened, reconnect fan power or the battery. Turn the fan on low, then high, listening for rubbing or clicking sounds. Hold a piece of paper near the guard outlet to confirm unblocked airflow. A ticking sound means the blade is hitting the guard. Turn the power off immediately and recenter the guard.
- Perform a Final Security Check: Wiggle the guard by hand — it should feel solid, with no free play. Check that no bolts are loose, and verify the guard does not contact any nearby wiring or the vehicle's interior panels. A loose guard can vibrate loose over time. If you drive off-road, recheck the bolts after the first week.
What You'll Need
-
AceK9 Heavy-Duty Fan Guard: One-piece steel construction covers 10 and 12 fans. Works with Window and Door Guards but versatile for many applications. Balanced vent holes protect while allowing air movement. Black powder coat finish. You don't need to buy a separate guard for each fan size, and the finish holds up to daily vehicle use without flaking or rusting.
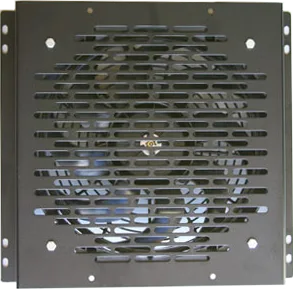
AceK9 Heavy-Duty Fan Guard