Quick Answer
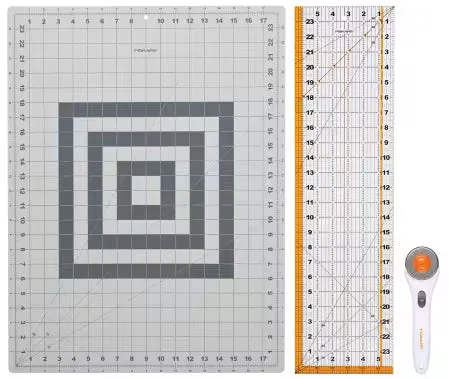
To use a rotary cutter safely, set up a self-healing cutting mat on a stable, waist-height surface, then cut away from your body with the blade guard retracted. Keep your ruler hand behind the ruler, not in the blade's path, and close the guard after every cut. Use a sharp blade and only as much pressure as the fabric needs. The Fiskars Rotary Cutting 3pc Set gives you a mat, ruler, and 45 mm cutter together so you can start with the right tools.
A rotary cutter can slice through multiple layers of fabric in one pass, which makes it faster than shears for quilting and straight cuts. That speed is also why safety habits matter from the very first cut. Most injuries happen when the blade is left open, the ruler hand drifts, or the cutter is pulled toward the body.
This rotary cutter tutorial walks through a safe setup, an ordered cutting process, and the checkpoints that keep your fingers clear. If you are new to the tool, start with a fresh blade, a mat that grips, and a ruler long enough to span the cut. The Fiskars Rotary Cutting 3pc Set covers those basics in one purchase.
Set Up a Safe Cutting Station
Choose a stable table at roughly waist height so you can press down without hunching. Place a self-healing cutting mat on the table; the mat protects the surface and gives the blade a consistent surface to cut against. Keep the area around the mat clear of pins, scissors, and loose fabric so nothing shifts mid-cut.
Good lighting matters more than most beginners expect. You need to see the ruler edge and the fabric grain clearly. If you are cutting at night, add a lamp that lights the mat without casting a shadow over the ruler line. A cluttered or dim station is a common reason cuts go crooked and fingers get close to the blade.
- Work on a surface that does not wobble; a wobbly table makes the ruler slip.
- Keep the blade guard closed whenever the cutter is set down, even for a second.
- Store the cutter out of reach of children and pets when you finish.
Choose the Right Blade and Mat for the Job
Rotary cutters come in different blade diameters, and the size changes how the tool handles. A 45 mm blade is a common all-purpose size for cutting multiple layers of fabric, which is why the Fiskars set pairs a 45 mm Classic Stick Rotary Cutter with an extra-large cutting mat and an acrylic ruler. The larger mat gives you room to work, and the acrylic ruler helps you measure before you cut.
Match the blade to the material. A sharp blade cuts fabric cleanly; a dull blade forces you to press harder, which is when the cutter can jump the ruler. If the cutter starts skipping or chewing the fabric, stop and replace the blade rather than pushing through. Always dispose of used blades in a rigid container, not loose in the trash.
- Keep a spare blade on hand so you can swap instead of forcing a dull one.
- Use a mat large enough that the fabric and ruler are fully supported.
- Never cut paper or cardboard with a fabric blade; it dulls the edge fast.
Position Your Hands and Body Correctly
Stand or sit so the cut travels away from your body, never toward it. Place your ruler hand flat on the ruler with fingers safely behind the ruler's edge, not wrapped around it. Your cutter hand grips the handle with the index finger on top for control, and the blade stays against the ruler as you move forward.
Keep your wrist straight and your shoulder relaxed. If you have to reach far across the mat, walk to the other side or rotate the fabric instead of stretching. The most common mistake is letting the ruler hand creep forward as the cutter approaches; that is exactly where the blade is heading.
- Cut away from your body, never toward your lap or torso.
- Keep fingers behind the ruler edge, not on top of the cut line.
- Rotate the mat or fabric instead of overreaching.
Make the Cut in One Controlled Pass
Line up the ruler with your measurement, press down firmly so it does not shift, then draw the cutter along the ruler in one smooth motion. Use steady pressure rather than a fast swipe. For multiple layers, make sure the fabric is flat and free of folds; a fold can catch the blade and pull the ruler out of alignment.
After each cut, close the blade guard before you move the ruler or fabric. This single habit prevents most accidental nicks. If the cut is long, reposition your hands and continue in a second pass rather than stretching to finish in one motion. A consistent rotary cutting guide routine is safer than a fast one.
- Press the ruler down before the blade touches fabric.
- Cut in one direction; do not saw back and forth.
- Close the guard every time you pause.
Check Your Cut and Maintain Your Tools
Lift the ruler and check the edge. If the fabric is not fully separated, do not run the blade back through the same line with the ruler still in place; realign and make a fresh pass. Clean the mat of lint and threads, and wipe the blade area only when the guard is closed and the cutter is unplugged from your hand, so to speak, by setting it down first.
Store the cutter with the guard closed and the blade retracted. Replace blades when cuts start needing extra pressure. A well-maintained cutter is easier to control, and control is what keeps the rotary cutter safe. If you are building a beginner setup, the Fiskars set includes the mat, ruler, and cutter so you are not mixing mismatched sizes.
- Replace the blade at the first sign of skipping or tearing.
- Wipe the mat clean so debris does not tilt the ruler.
- Store the cutter closed and away from children.
Your Safe Rotary Cutting Routine, Step by Step
- Set up the mat and clear the table: Place a self-healing cutting mat on a stable, waist-height surface and remove pins, scissors, and clutter from the cutting area. Checkpoint: the mat should not slide when you press on it.
- Check the blade and close the guard: Confirm the blade is sharp and the guard is closed before you pick up the cutter. A 45 mm blade is a good all-purpose size for multiple layers. Checkpoint: if the blade skips or tears fabric, replace it before cutting.
- Position the ruler and your hands: Line the ruler up with your measurement, press it flat, and keep your ruler hand behind the ruler edge with fingers clear of the cut line. Checkpoint: cut away from your body, never toward it.
- Cut in one smooth pass: Retract the guard, press the blade against the ruler, and draw the cutter forward with steady pressure. Do not saw back and forth. Checkpoint: close the guard immediately after the cut.
- Inspect, clean, and store: Lift the ruler, check the cut, and realign for a fresh pass if needed. Clean lint from the mat and store the cutter with the guard closed. Next step: keep spare blades on hand so you never force a dull one.
Tools That Support Safe Rotary Cutting
- Fiskars Rotary Cutting 3pc Set - Cutting Mat, Ruler and Rotary Cutter: The set includes a Classic Stick Rotary Cutter with a 45 mm blade, an extra-large cutting mat, and an acrylic ruler. A 45 mm blade handles multiple layers of fabric, and the mat and ruler give you the stable surface and straight edge that safe cuts depend on.
- Strap & Hardware Kit for the Crosscut Sewing Belt Bag Pattern: The kit includes 1 1/2 yards of 35mm polyester webbing, one 1 1/2 inch swivel clasp, one 1 1/2 inch rectangle ring, and one 1 1/2 inch sliding buckle. Once your rotary cutting is accurate, you can cut webbing and bag pieces cleanly for projects like a belt bag, where straight edges matter.
Safe rotary cutting comes down to setup, hand position, and one clean pass at a time. Keep the guard closed, cut away from your body, and replace dull blades early. With a mat, ruler, and 45 mm cutter like the Fiskars Rotary Cutting 3pc Set, you have the core tools to build the habit from your first project.