Quick answer
To use a walking foot for quilting, attach the foot so its upper feed dog sits above the needle plate, set a straight stitch around 2.5–3.0 mm, and let the foot feed the top and bottom layers together. Guide the quilt sandwich with light hands, support the weight, and test on a scrap first. This is the most reliable way to sew straight line quilting without the top layer shifting.
A walking foot is the simplest way to quilt straight lines without the top fabric shifting ahead of the batting. It adds an upper feed dog that moves in sync with the machine's lower feed dog, so all three layers travel together instead of the top layer being dragged by the needle.
This walking foot tutorial covers the full process: attaching the foot, setting up the quilt sandwich, choosing stitch length, managing bulk, and knowing when a walking foot is the right choice versus free motion. It also covers the mistakes that cause wavy lines, broken needles, and puckered seams.
What a walking foot actually does
A standard presser foot holds the fabric down while only the lower feed dogs move it forward. On a quilt sandwich, the top layer can slide against the batting and drift, which is why straight lines come out wavy or the backing puckers. A walking foot adds an upper feed dog above the needle plate that moves at the same speed as the lower one, gripping the top layer and feeding it in step with the bottom.
That synchronized feed is the whole point. It does not eliminate the need to support the quilt's weight, and it does not replace good pinning or basting, but it removes most of the layer-shift problem that makes straight line quilting frustrating on a regular foot.
- A walking foot is for straight and gently curved lines, not for free-motion quilting.
- It also helps with challenging fabrics like knits, vinyl, and laminated cotton because the upper feed dog keeps them moving evenly.
Attaching the walking foot correctly
Most walking feet replace the standard presser foot and shank. Raise the needle and presser foot, remove the existing foot and shank if your machine requires it, then slide the walking foot onto the presser foot bar. The fork or lever on the side of the foot must sit around the needle clamp screw so the upper feed dog moves when the needle moves. If that lever is not engaged, the foot will drag instead of feed.
Lower the presser foot and turn the handwheel through one full stitch cycle by hand. Watch the upper feed dog: it should move forward and back in time with the lower feed dogs, and the needle should pass cleanly through the opening. If anything knocks or binds, stop and re-seat the foot before you sew.
- Checkpoint: turn the handwheel by hand for one full cycle before you touch the pedal.
- Common mistake: leaving the fork off the needle clamp screw, which makes the foot act like a heavy standard foot.
Setting up the quilt sandwich and machine
Baste or pin the quilt sandwich so the layers cannot shift before they reach the needle. Spray basting, safety pins, or a long-arm stitch are all fine; what matters is that the layers are held together across the whole quilt, not just the edges. Roll or fold the quilt so only the section you are quilting passes under the arm, and support the rest on a table so its weight is not pulling against the feed.
Set a straight stitch with a length around 2.5–3.0 mm. A slightly longer stitch than you would use for piecing helps the walking foot feed smoothly and reduces thread breakage. Use a new sharp needle sized for your batting and fabric, and thread that matches or deliberately contrasts with the quilt top.
- Checkpoint: sew a test sandwich of the same fabric, batting, and backing before you start on the real quilt.
- Common mistake: letting the quilt hang off the table, which drags the layers and causes uneven stitches.
Sewing straight line quilting with a walking foot
Start at one edge, lower the needle into the quilt, and sew at a moderate, consistent speed. Let the machine feed the fabric; your hands should guide, not pull. If you pull the quilt forward, the stitches get long and the layers can still shift. If you hold it back, the needle can deflect and break. Keep your hands flat on either side of the foot, moving the quilt only enough to keep the line straight.
For a grid or crosshatch, quilt all the lines in one direction first, then turn the quilt and quilt the crossing lines. This is faster and keeps the bulk more manageable than quilting one square at a time. If you are quilting in the ditch, slow down and watch the seam line, not the needle.
- Checkpoint: stop with the needle down when you reposition your hands.
- Common mistake: sewing too fast on the first pass, which makes wavy lines and uneven stitch length.
Tension, thread, and troubleshooting
If the top thread shows on the back or the bobbin thread shows on the top, adjust the top tension in small increments and retest on a scrap. A walking foot can change how the thread pulls through the tension discs, so what worked with a standard foot may need a slight tweak. Loops on the underside usually mean the top tension is too loose or the foot is not threaded correctly.
Skipped stitches, broken needles, and a loud knocking sound usually point to the foot not being seated, the fork not engaged, or the needle hitting the foot. Stop immediately, raise the needle, and check the foot position before continuing. If the quilt is very thick at a seam, slow down and use the handwheel to ease through the bulk.
- Checkpoint: always test tension on a scrap sandwich, not on the quilt.
- Common mistake: forcing the quilt through a thick intersection instead of slowing down and hand-cranking.
Walking foot vs free motion: choosing the right method
Use a walking foot when you want straight lines, grids, crosshatching, or stitch-in-the-ditch. It gives you predictable, even stitches and is much easier to learn than free motion. Use free motion when you want loops, meanders, or custom quilting designs that require moving the fabric in any direction. Free motion requires dropping the feed dogs and using a free-motion or darning foot.
Many quilters combine both: straight line quilting with a walking foot in the borders or sashing, and free motion in the center panels. If you are new to quilting, start with a walking foot on a small project and build confidence before moving to free motion.
- Walking foot: straight lines, grids, gentle curves, predictable results.
- Free motion: custom designs, meanders, any direction, steeper learning curve.
Walking foot quilting steps at a glance
- Attach and engage the foot: Remove the standard foot, slide the walking foot onto the presser foot bar, and hook the fork around the needle clamp screw so the upper feed dog moves with the needle. Checkpoint: hand-turn one full stitch cycle and confirm the upper feed dog moves before you sew.
- Baste and support the quilt: Pin, spray-baste, or stitch the layers together, then roll or fold the quilt so only the working section is under the arm and the rest is supported on a table. Checkpoint: the quilt should not hang or pull; if it does, add support before sewing.
- Set stitch length and test: Choose a straight stitch around 2.5–3.0 mm, install a sharp needle, and sew a test sandwich of the same materials to check tension and stitch quality. Checkpoint: adjust top tension on the scrap until the stitches look balanced on both sides.
- Sew the first line: Start at one edge, lower the needle, and sew at a moderate, consistent speed. Guide the quilt with flat hands; do not pull or hold it back. Checkpoint: stop with the needle down when you reposition your hands.
- Quilt all lines in one direction: Sew every parallel line first, then turn the quilt and sew the crossing lines to create a grid or crosshatch. Checkpoint: slow down at thick intersections and hand-crank if needed.
- Check and troubleshoot: Inspect the back for loops or puckers, adjust tension in small steps, and stop immediately if you hear knocking or the needle hits the foot. Checkpoint: re-seat the foot if the fork is not engaged or the foot is not sitting flat.
Tools that make walking foot quilting easier
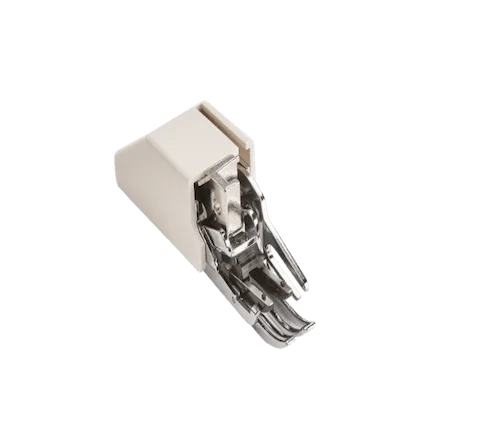
- Bernette 08 Walking Foot: The b08 Walking Foot features an upper feed dog that works in sync with the machine's lower feed dog, moving the fabric evenly and ensuring smooth, consistent stitching. This synchronized feed is exactly what prevents the top layer from shifting during straight line quilting, so your lines stay straight and your backing stays smooth.
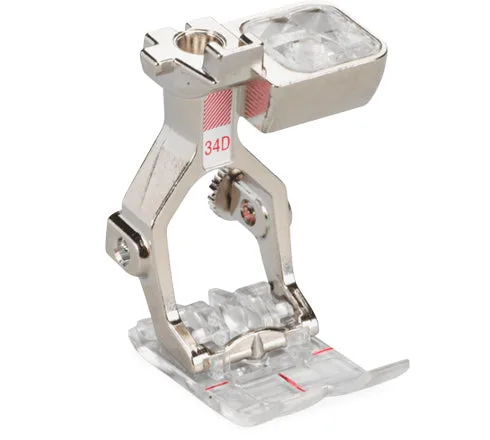
- #34D BERNINA Reverse-pattern Foot with Clear Sole: The BERNINA #34D Reverse-pattern Foot combines a clear sole with an adjustable guide for precision decorative and reverse-pattern stitching. The clear sole and built-in guide help you keep parallel quilting lines evenly spaced, which is useful for crosshatch and border quilting where consistency matters.
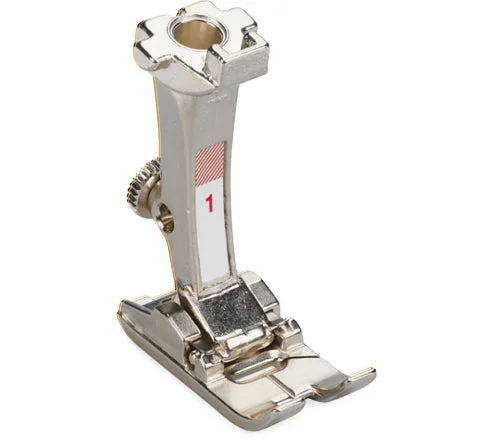
- #1 BERNINA Reverse-pattern Foot: For forward and reverse-feed stitches, for materials such as cord, denim and wool, and guarantees excellent fabric feed for 5.5 mm and 9 mm machines. If you quilt with heavier materials or need reliable feed on thick seams, this foot's design supports consistent feeding on challenging fabrics.
A walking foot turns straight line quilting from a fight with shifting layers into a predictable, repeatable process. Attach it correctly, support the quilt, test on a scrap, and let the foot feed the fabric. Once you are comfortable, you can use the same setup for grids, crosshatching, and stitch-in-the-ditch on almost any quilt.