Quick Answer
Use the BERNINA #97D Patchwork Foot with its built-in ¼" guide for consistent piecing, and adjust the guide when you need a different seam allowance. This foot gives you accurate seams without measuring each time.
Why the #97D Foot Improves Accuracy
The BERNINA #97D Patchwork Foot has a built-in ¼" seam guide, so you can align fabric edges against it and sew straight, consistent seams without constantly checking. This is a big advantage over using the edge of the presser foot, which may not be exactly ¼" from the needle.
The adjustable guide also lets you switch to other seam widths, such as ⅜" or ½", for projects like bag making or garment sewing. This flexibility makes the foot useful beyond just patchwork.
Because the guide is built into the foot, there's no separate attachment to lose or misalign. Once you set it, it stays put, so you can sew a whole quilt top with the same accuracy.
Trade-Off: Adjustable Guide vs. Fixed ¼" Foot
A dedicated ¼" foot with a fixed guide is simpler—you just butt the fabric against it and sew. The #97D's adjustable guide adds a small step: you must set it correctly before you start. If you forget to tighten it, the guide can shift mid-project, causing uneven seams.
The trade-off is worth it if you sew more than just patchwork. The ability to change seam widths without changing feet saves time and money. But if you only ever need ¼" seams, a fixed guide might be more foolproof.
Practice on scrap fabric first to confirm your seam allowance is accurate. Sew two strips together, press, and measure the resulting seam. Adjust the guide if needed.
Step-by-Step: Using the BERNINA #97D Patchwork Foot
- Attach the Foot: Remove your current presser foot and snap the #97D onto the shank, ensuring it clicks into place. Lower the presser foot lever to secure it. Make sure the foot is firmly attached before sewing; a loose foot can cause skipped stitches or uneven seams.
- Set the Guide Position: Loosen the screw on the adjustable guide, position it so the distance from the needle to the guide equals your desired seam allowance (e.g., ¼"), then tighten the screw. Use a ruler to verify. Always measure from the needle, not the edge of the foot, to ensure accuracy.
- Test on Scrap Fabric: Sew two strips of fabric together using the guide as your edge. Press the seam open and measure the seam allowance from the stitching line to the fabric edge. If the measurement is off, adjust the guide and test again before starting your project.
- Sew Your Project: Align the fabric edge against the guide and sew at a steady pace, keeping the edge in contact with the guide throughout. Let the machine feed the fabric naturally—don't pull. Stop and check your seam width periodically, especially after changing thread or fabric weight.
Product Facts
-
#97D BERNINA Patchwork Foot: Built-in ¼" seam guide for perfectly consistent patchwork seams; adjustable guide for variable seam allowance widths. You can sew accurate ¼" seams right away and change the guide when you need a different allowance, all without switching feet.
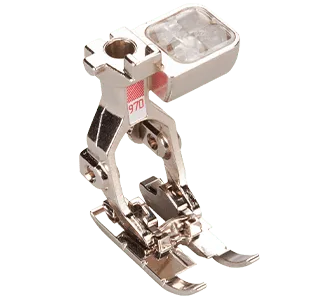
#97D BERNINA Patchwork Foot


