Quick answer
Use ZOKU's Chocolate Bomb Mold Set to create hollow chocolate spheres that you can fill with hot cocoa mix, marshmallows, or other surprises—then seal and wrap them as homemade gifts.
Why choose a silicone mold for chocolate bombs
Silicone molds are flexible, so releasing finished chocolate bombs is much easier than with rigid plastic molds. ZOKU's set includes two food-grade silicone trays, each with 3 smooth and 3 faceted cavities, giving you 12 bombs per batch. The flexibility also means you can gently pop out the halves without cracking them—a common frustration with cheaper molds.
Choosing the right chocolate for gifts
For a gift-worthy finish, use high-quality couverture chocolate or candy melts that temper well. Tempered chocolate snaps cleanly and has a glossy shine, while untempered chocolate may bloom or feel soft. If you're short on time, you can skip tempering by using chocolate chips with a little coconut oil, but the final texture won't be as crisp. For a foolproof approach, follow a standard chocolate tempering method before pouring into the mold.
How to make chocolate bombs for gifting
- Melt and temper the chocolate: Melt your chocolate using a double boiler or microwave in short bursts, stirring until smooth. For a glossy finish, temper it by cooling to 88–90°F (31–32°C) for dark chocolate. A common mistake: overheating chocolate causes it to seize or bloom—keep the temperature below 120°F.
- Fill the mold cavities: Spoon or pipe a small amount of tempered chocolate into each cavity of the ZOKU silicone tray. Use a pastry brush or the back of a spoon to coat the sides evenly, creating a shell about 1/8-inch thick. Tap the tray gently on the counter to release air bubbles. Common mistake: leaving the shell too thin at the edges makes the bomb fragile and prone to cracking.
- Chill and unmold the halves: Place the filled tray in the refrigerator for 5–10 minutes until the chocolate is firm but not brittle. Gently flex the silicone tray to release each half. If the chocolate sticks, chill for another 2 minutes. Common mistake: over-chilling makes the chocolate too hard to release cleanly—check at 5 minutes. If the halves crack, the chocolate was too cold or the shell was too thin. Remelt and try again with a thicker coating.
- Fill and seal the bombs: Warm a small plate or skillet on low heat. Place one chocolate half on it for 3–5 seconds to melt the rim slightly. Fill the half with hot cocoa mix, mini marshmallows, or other treats. Immediately press a second half on top and hold for 10 seconds to seal. Common mistake: overheating the rim causes the chocolate to drip or lose its shape—just a few seconds is enough.
- Decorate and gift-wrap: Drizzle melted white or dark chocolate over the sealed bomb and add sprinkles, crushed candy canes, or edible glitter before the drizzle sets. Once fully set, place each bomb in a cellophane bag or a small gift box with a ribbon. Common mistake: adding heavy decorations before the drizzle hardens causes them to sink—let the drizzle set for 2 minutes first. Store finished bombs in a cool, dry place for up to two weeks. Avoid refrigerating after sealing, as condensation can ruin the shine.
Product facts
-
Chocolate Bomb Mold Set: Each set includes two food-grade silicone trays designed for effortless release, letting you make 12 delectable chocolate bombs—3 smooth and 3 faceted in each tray. You get two different textures in one batch, so your gift box can include both smooth and faceted bombs without buying extra molds.
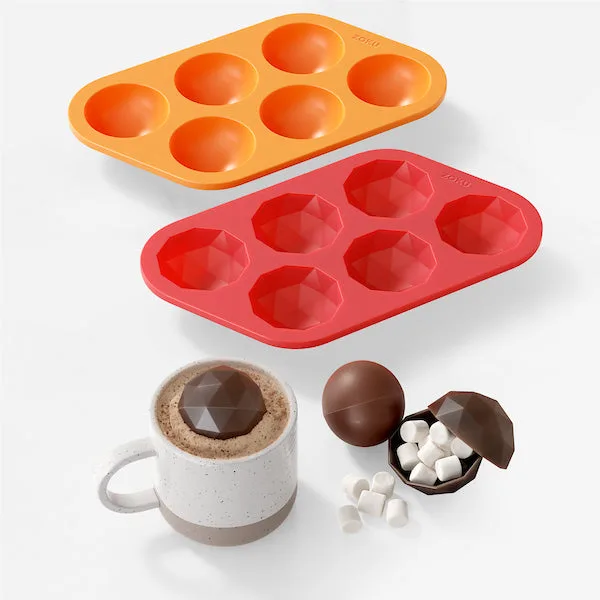
Chocolate Bomb Mold Set