Quick Answer
To use a walking foot for even fabric feeding, attach it to your sewing machine, set your stitch length, and sew slowly while guiding the fabric evenly. The foot's upper feed dog works with the lower one to prevent layers from shifting.
Why a Walking Foot Helps
A walking foot is a presser foot with its own set of feed dogs on top. It works with the machine's lower feed dogs to move the fabric layers together, preventing the top layer from sliding or stretching. This is especially helpful when sewing multiple layers, such as in quilting, or when working with slippery or sticky fabrics.
Without a walking foot, you might notice uneven seams, puckering, or shifted patterns. The walking foot solves these issues by ensuring even fabric feeding from both sides.
When to Use a Walking Foot
Use a walking foot for straight stitching on thick or multi-layered projects like quilts, denim, or canvas. It is also useful for matching plaids or stripes, and for sewing with fabrics that tend to stick, like vinyl or leather.
However, a walking foot is not ideal for decorative stitches or tight curves because its bulk can make maneuvering difficult. For those tasks, a standard presser foot or a free-motion foot is better.
Step-by-Step: Using a Walking Foot
- Attach the Walking Foot: Remove the standard presser foot and shank, then attach the walking foot according to your machine's instructions. Make sure the fork on the foot fits over the needle clamp screw. If your machine uses a snap-on system, simply snap it into place. Always check that the foot is securely attached before sewing to avoid it coming loose.
- Set the Stitch Length: Set your stitch length to a medium setting, usually 2.5 to 3.0 mm for most fabrics. For quilting, a slightly longer stitch (3.0–3.5 mm) works well. Avoid very short stitches, as they can cause fabric bunching. Test on a scrap piece to find the best stitch length for your project.
- Align the Fabric: Place your fabric under the foot, aligning the seam line with the needle. Lower the presser foot lever. For multiple layers, use pins or clips to keep them together, but avoid placing them over the feed path. Use a seam guide or tape on the bed to keep your seam allowance consistent.
- Sew Slowly and Steadily: Start sewing at a moderate speed, guiding the fabric gently with your hands. Let the walking foot do the work—do not pull or push the fabric. Keep the fabric flat and smooth in front and behind the needle. If you notice puckering, stop and check that the foot is correctly attached and the fabric is not being stretched.
- Finish and Check the Seam: When you reach the end, sew a few reverse stitches to lock the seam, then cut the threads. Remove the fabric and inspect the seam for evenness. If you see any shifting, adjust your speed or fabric handling. Practice on scraps until you feel confident before sewing your actual project.
Product Fact
-
Bernette Walking foot b37/b38: The Bernette Walking foot b37/b38 supports fabric feed by a second feed dog on the upper side of the foot, moving the sewing project with two feed dogs for a smooth process. This design ensures both layers move together, reducing the need for manual guiding and helping you achieve even seams.
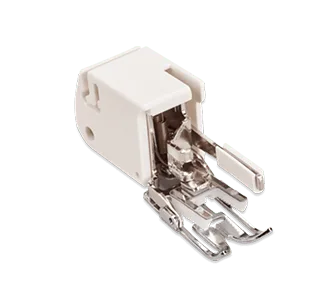
Bernette Walking foot b37/b38


