Quick answer
Charge the renewed iPad 8th Gen fully, run the on-screen setup with your own Apple ID, then set storage rules before installing apps. That order prevents the most common first-day problems on a 32GB iPad.
Why a renewed iPad needs a slower first hour
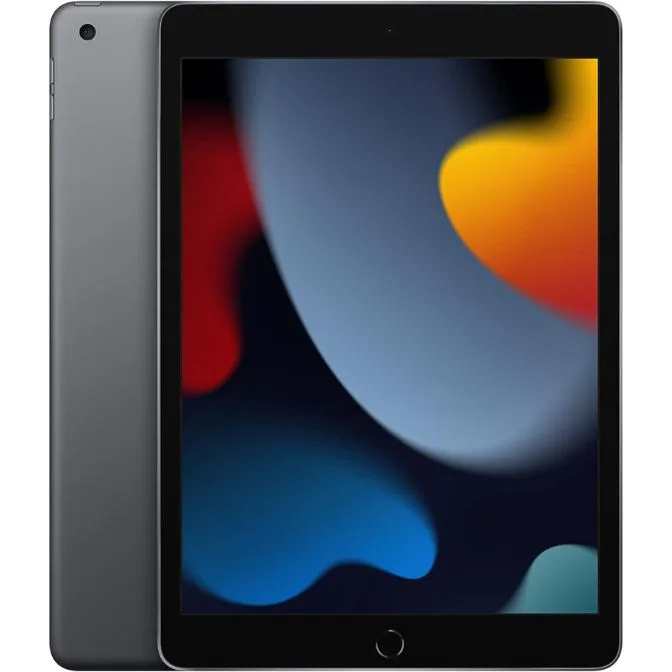
A factory renewed iPad arrives wiped and ready for a new owner, but it may have been sitting in a warehouse or handled during testing. Give the battery a full charge and check the 10.2-inch Retina display for cracks or dead spots before you sign in to anything. If something looks wrong, you want to discover it before your Apple ID and apps are tied to the device.
The 32GB model is the other reason to slow down. iPadOS and built-in apps take up part of that space, so a large game or a full photo library can fill the iPad faster than you expect. Decide what the iPad is for—reading, video calls, notes, streaming—before you start downloading.
What the catalog tells you—and what it does not
The supplied listing confirms a 10.2-inch Retina display, A12 Bionic chip, 8MP rear and 1.2MP front cameras, stereo speakers, Wi-Fi 5, Lightning connector, up to 10-hour battery life, Touch ID, and support for Apple Pencil (1st Gen) and Smart Keyboard. Those facts are enough to plan everyday use, but the listing does not state the iPadOS version, battery health, or whether a charger is included. Treat those as things to confirm in the box or with the seller before setup.
Step-by-step setup for a renewed iPad 8th Gen
- Charge before you begin: Plug the iPad into a known-good Lightning cable and charger and let it reach a comfortable charge before starting setup. Common mistake: assuming a renewed unit ships with a charger—confirm what is in the box and use your own if needed. If the iPad will not power on after 30 minutes of charging, stop and contact the seller before setup.
- Inspect the hardware: Look over the screen, corners, camera lenses, and speakers, then press the Home button to test Touch ID. Common mistake: rushing past physical checks and discovering a problem after your accounts are signed in.
- Choose language, Wi-Fi, and Apple ID: Follow the on-screen prompts, connect to Wi-Fi 5 or your home network, and sign in with your own Apple ID or create one. Common mistake: using someone else's Apple ID, which can lock the iPad to an account you do not control. Enable two-factor authentication on your Apple ID before you install apps.
- Set up Touch ID and a passcode: Enroll a fingerprint and set a passcode when prompted. Common mistake: skipping the passcode because setup feels long—without it, Apple Pay and secure app logins are harder to use.
- Update iPadOS, then set storage rules: Install any available iPadOS updates, then turn on iCloud Photos optimization or choose to keep photos off the device. Common mistake: downloading a large game or video library before checking free space on the 32GB drive. Aim to keep at least a few gigabytes free so updates and apps have room to work.
- Install only the apps you will use this week: Add your essential apps—mail, notes, streaming, video calling—and test the 8MP rear and 1.2MP front cameras with a quick photo and FaceTime call. Common mistake: restoring a full backup from an old iPad, which can fill 32GB immediately.
Product facts
-
Apple iPad (10.2-inch, Wi-Fi, 32GB) - Silver (Latest Model, 8th Generation) (factory renewed): 10.2-inch Retina display with A12 Bionic chip and up to 10-hour battery life. The screen and chip handle everyday apps and video, while the battery rating means a full charge should cover a typical day of mixed use.
Apple iPad (10.2-inch, Wi-Fi, 32GB) - Silver (Latest Model, 8th Generation) (factory renewed)
Apple iPad (10.2-inch, Wi-Fi, 32GB) - Silver (Latest Model, 8th Generation) (factory renewed)
-
Apple iPad (10.2-inch, Wi-Fi, 32GB) - Silver (Latest Model, 8th Generation) (factory renewed): Supports Apple Pencil (1st Gen) and Smart Keyboard; 32GB storage capacity. You can add note-taking or typing accessories later, but the 32GB capacity makes storage planning part of setup rather than an afterthought.