Quick Answer
To install a KeyMod rail section, align the rail's nuts with the KeyMod slots on your handguard, insert, slide forward, and tighten the screws evenly. Use a torque wrench to avoid over-tightening, and always check that the rail is secure before mounting accessories.
What You Need
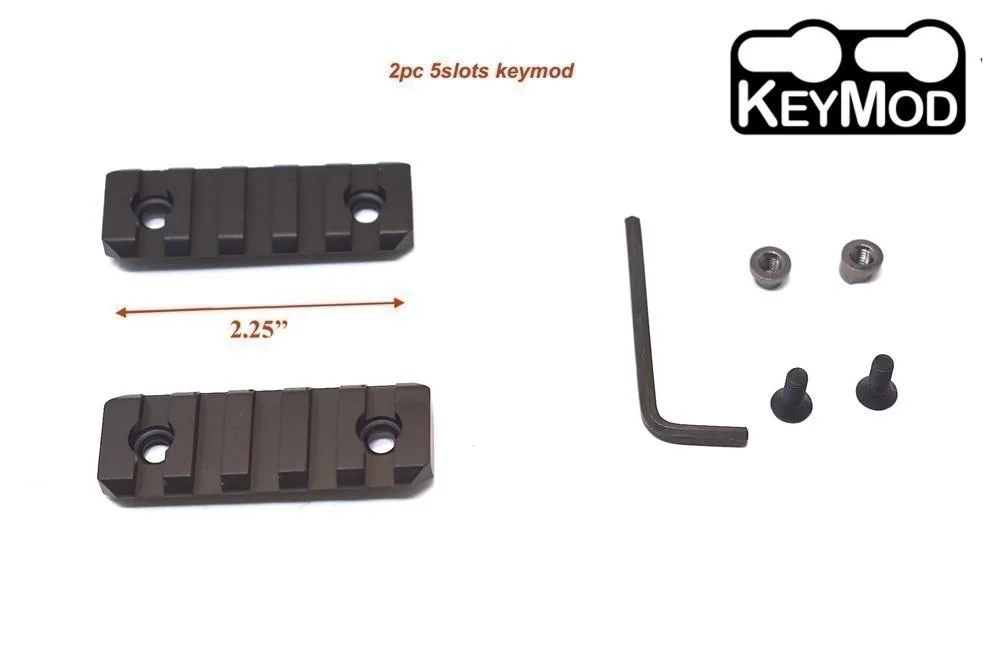
Before starting, gather a KeyMod rail section (such as the 2pc 2.25'' Keymod rail section 5 slots Picatinny rail), a hex wrench or Allen key, and optionally a torque wrench. The rail section typically includes mounting hardware, so check the package contents before you begin.
Ensure your handguard has KeyMod slots—these are the keyhole-shaped openings. If you're unsure, compare the slot shape to the rail's nuts. The KeyMod system uses a nut that fits through the round part of the slot and slides into the narrow part.
Preparation and Safety
Always verify that your firearm is unloaded and clear before working on it. Work on a stable surface with good lighting. If your handguard is already installed, you can mount the rail without removing the handguard, but make sure you can access the slots comfortably.
Check that the rail section's nuts are aligned with the KeyMod slots. The nuts should be oriented so they fit through the larger hole and then slide into the narrower channel. This is the most common point where installers get stuck.
Installation Steps
- 1. Align the Rail Section: Position the KeyMod rail section over the desired slots on your handguard. The two nuts on the rail should line up with the round openings of the KeyMod slots. Checkpoint: If the nuts don't align, rotate the rail 180 degrees—some sections are directional.
- 2. Insert and Slide: Press the rail section into the handguard so the nuts pass through the round holes. Then slide the rail forward (toward the muzzle) so the nuts move into the narrow part of the slots. Common mistake: sliding backward instead of forward. Always slide toward the muzzle for a secure lock.
- 3. Tighten the Screws: Use the provided Allen wrench to tighten the screws evenly. Alternate between screws, turning each a little at a time, until the rail is snug. Avoid over-tightening, as this can strip the threads or damage the handguard. Checkpoint: If you have a torque wrench, aim for the manufacturer's recommended value (typically 15–20 in-lbs). If not, tighten until the rail doesn't move when you push on it.
- 4. Test the Mount: After tightening, try to wiggle the rail section. It should be firmly attached with no play. Attach a lightweight accessory temporarily to confirm the rail holds it securely. Common mistake: skipping this test and later finding the rail loose under recoil. Always test before heading to the range.
Product Fact: KeyMod Rail Section
- 2pc 2.25'' Keymod rail section 5 slots Picatinny rail: 2.25 inch (5 Slots) quality built rail system with lightweight aerospace-grade aluminum alloy with durable black matte finish. Mil-spec 5-slot Picatinny rail section fully compatible with any KeyMod handguard mounting system. Includes mounting hardware. This rail section gives you five standard Picatinny slots to mount optics, lights, or grips. The aerospace-grade aluminum keeps weight low, and the included hardware means you don't need to buy extra screws or nuts.
Once your KeyMod rail section is installed, you can mount Picatinny-standard accessories like scopes, red dots, lights, or grips. If you're adding multiple sections, repeat the steps for each. For a different mounting system, check out our guide on KeyMod vs M-LOK to understand the tradeoffs.