Quick Answer
Assemble the AeroTech K270W-PS reload kit by first confirming you have the RMS-54/2560 motor hardware, then installing the forward seal disc and extended forward closure in the correct order to ensure safe, reliable flights.
Why Hardware Compatibility Matters
The K270W-PS reload kit is designed specifically for the AeroTech RMS-54/2560 motor hardware. Using the wrong hardware set—such as a 38mm or 75mm system—will prevent proper sealing and could cause catastrophic failure. Always verify that your hardware matches the reload kit's designation before starting assembly.
The reload kit includes the propellant grains, O-rings, and delay elements, but you must supply the aluminum casing, forward closure, aft closure, and seal disc separately. The forward seal disc (54FSD) and 54mm extended forward closure (54FCE) are required for this specific load.
Step-by-Step Assembly for the AeroTech K270W-PS Reload Kit
- 1. Inspect and Prepare Hardware: Lay out your RMS-54/2560 aluminum casing, forward closure (54FCE), aft closure, and forward seal disc (54FSD). Check that all threads are clean and free of debris. Lightly lubricate O-rings with the supplied AeroTech grease. Common mistake: Skipping O-ring lubrication can cause gas blow-by and motor failure.
- 2. Install the Forward Seal Disc: Slide the 54FSD into the casing from the forward (nozzle) end until it seats against the internal shoulder. Ensure the disc is oriented with the flat side toward the propellant grains. Checkpoint: The seal disc must sit flush—if it tilts, the propellant stack will not align properly.
- 3. Insert Propellant Grains: Stack the propellant grains one by one into the casing, following the order indicated in the reload kit instructions. Use a gentle twisting motion to seat each grain against the previous one. Common mistake: Forcing grains can crack them; if resistance is felt, stop and verify the seal disc position.
- 4. Install Delay and Ejection Charge: Place the delay element and then the ejection charge into the forward end of the casing, per the kit's delay drilling instructions. Ensure the delay grain is the correct length for your desired delay time. Checkpoint: The delay must be drilled only if you need a shorter delay—drilling too deep can cause early deployment.
- 5. Attach the Extended Forward Closure: Thread the 54FCE onto the casing hand-tight, then use a strap wrench to snug it an additional 1/8 turn. Do not overtighten—aluminum threads can strip. Common mistake: Overtightening can deform the closure or strip threads, ruining the hardware.
- 6. Final Check and Storage: Verify that all components are seated and the closure is secure. Store the assembled motor in a cool, dry place away from ignition sources until launch day. Checkpoint: Always perform a continuity test with your launch controller before installation in the rocket.
Product Facts
-
AeroTech K270W-PS RMS-54/2560 Reload Kit (1 Pack) - 112714: The AeroTech K270W-PS RMS-54/2560 reload kit is an aluminum cased reusable motor in kit form that is assembled by the user. This means you need to own or purchase the separate RMS-54/2560 motor hardware set to complete the motor—this reload alone is not a standalone motor.
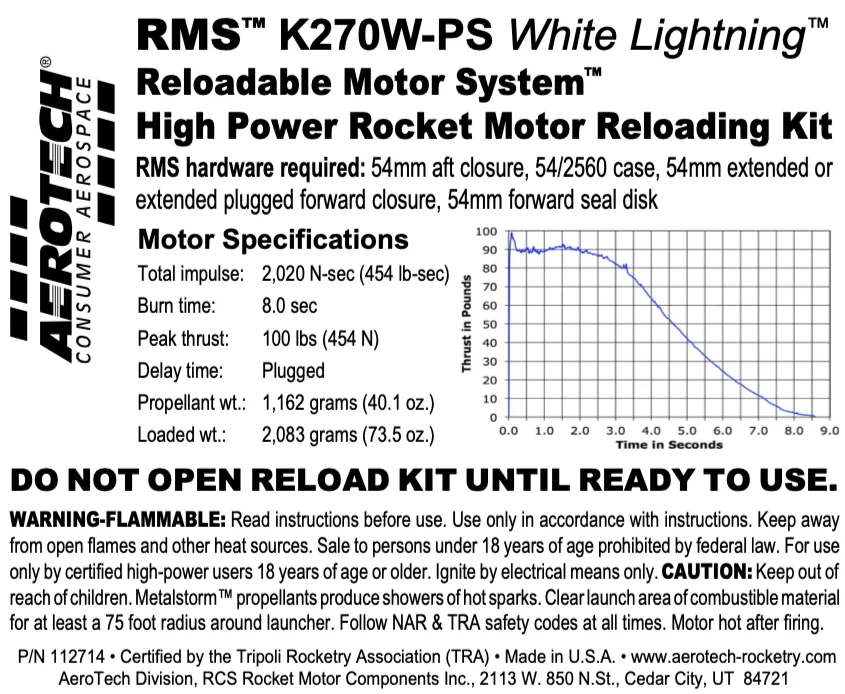
AeroTech K270W-PS RMS-54/2560 Reload Kit (1 Pack) - 112714
-
AeroTech K270W-PS RMS-54/2560 Reload Kit (1 Pack) - 112714: This motor requires installing a forward seal disc (54FSD) and a 54mm extended forward closure (54FCE). These parts are not included in the reload kit and must be sourced separately; omitting them will prevent proper sealing and safe ignition.