Quick answer
Use a double-cord presser foot to feed two cords side by side under the needle so the stitching stays parallel to the cord channels. Set a straight stitch, align the cord channels with the foot grooves, and sew slowly with the fabric layers held flat. Test on a scrap of the same fabric and cord first, because cord thickness and foot groove depth must match for clean piping.
A double-cord presser foot solves a specific problem: keeping two cords evenly spaced and covered while you sew piping or decorative corded trim. Unlike a standard piping foot, which guides one cord, this foot has two grooves or channels underneath, so both cords feed together and the needle stitches just beside them. The result is consistent, parallel piping without the cords twisting or drifting.
This guide walks through the full process, from choosing cord and fabric to finishing corners and troubleshooting skipped stitches. It also explains when a double-cord foot is the right tool and when a single-cord foot or binder foot is the better choice. If you already own a BERNINA or bernette machine, check your accessory list before buying, because some feet are machine-specific.
What a double-cord presser foot does and when to use it
A double-cord presser foot has two parallel grooves on the underside that hold two cords at a fixed distance apart. As you sew, the foot keeps the cords aligned while the needle stitches a straight line just outside each cord channel. This is useful for piping on cushions, bag edges, garment seams, and home decor, where two rows of cording create a wider, more decorative trim than a single cord.
Use it when you want two cords visible side by side, or when you are covering a thick seam with corded trim. Do not use it for single piping, because the empty groove can let the fabric pucker. For single piping, a standard piping foot or an adjustable zipper foot gives better control. For bias-tape binding with pre-folded tape, a binder foot is the correct tool instead.
- Check that your machine accepts the foot shank before buying; snap-on and screw-on systems differ.
- Match cord diameter to the groove depth; too-thick cord will not sit flush and causes skipped stitches.
Choose cord, fabric, and thread that work together
Piping cord comes in different diameters, usually measured in millimeters. A double-cord foot is designed for a specific cord size range, so measure your cord before you start. If the cord is too thin, it will rattle in the groove; if too thick, the foot will ride up and the needle will miss stitches. Cotton cord is common for washable projects, while synthetic cord holds shape in bags and upholstery.
Cut bias strips wide enough to wrap around the cord plus a seam allowance. A good rule is four times the cord diameter plus two seam allowances, but test on scrap first. For thread, a 40wt polyester like Isacord Thread 40wt 1000M – Black gives smooth, strong stitches that resist fraying on corded seams. Use a new sharp needle, size 80/12 or 90/14 for medium fabric.
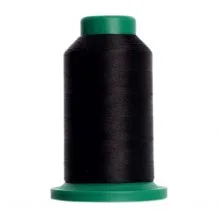
Isacord Thread 40wt 1000M – Black
- Pre-shrink cotton cord if the finished project will be washed.
- Sew a test sample with the exact fabric, cord, and thread before starting the real project.
Set up the machine and foot correctly
Attach the double-cord presser foot according to your machine's instructions. For snap-on shanks, press it on until it clicks; for screw-on shanks, lower the shank and tighten the screw with the foot centered. Thread the machine with a straight stitch, set stitch length to 2.5 to 3.0 mm, and reduce tension slightly if the cord makes the fabric feed unevenly. Lower the feed dogs only if you are doing free-motion work, which is not typical for piping.
Place the wrapped cord under the foot so each cord sits in its own groove. Lower the needle by hand to check that it lands just beside the cord, not on top of it. If the needle hits the cord, adjust the foot position or use a different needle plate. A straight-stitch plate with a single hole gives the best support and prevents the cord from sinking.
- Always turn the handwheel toward you to check needle position before sewing.
- If the foot has a clear sole, you can see the cord channels and adjust as you go.
Sew the piping step by step
Start with the fabric right side up and the wrapped cord on top, aligned with the raw edge. Position the cord under the foot so the stitching line will be the seam allowance you planned, usually 1/2 inch or 5/8 inch. Sew slowly and steadily, letting the foot guide the cord. Do not pull the fabric; the feed dogs should move it. Stop with the needle down when you need to adjust, and keep the cords parallel.
For long strips, sew in sections and check the cord alignment every few inches. If the cord shifts, stop, lift the foot, and reset it. When you finish, press the piping seam allowance open or to one side, depending on your project. Trim the cord ends close to the fabric to reduce bulk in the seam.
- Sew a few stitches, then check the back; if loops appear, increase top tension slightly.
- Use a stiletto or awl to hold the cord in place near the needle, not your fingers.
Turn corners and join ends cleanly
At a corner, stop with the needle down at the pivot point, lift the presser foot, and rotate the fabric. Because the double-cord foot holds two cords, you may need to snip the seam allowance of the cord slightly at the corner to let it bend. Do not cut through the stitching. For outside corners, clip the cord close to the seam; for inside corners, clip the fabric seam allowance to the stitching line so it can spread.
To join two lengths of piping, overlap the ends, wrap them around the cord, and stitch across the overlap. Trim the excess cord so the join lies flat. If you are making a continuous loop, such as for a pillow edge, leave an opening, join the ends, then close the opening by hand or machine. Test the join on scrap first, because bulky joins can show on the finished edge.
- Use a seam ripper carefully to remove stitches without cutting the cord.
- Press corners gently with a tailor's clapper to set the fold.
Troubleshoot common double-cord foot problems
Skipped stitches usually mean the needle is the wrong size or the cord is too thick for the groove. Switch to a larger needle or a different cord. If the fabric puckers, reduce tension or shorten the stitch length. If the cord slips out of the groove, check that the foot is seated properly and that the cord diameter matches the foot. For heavy fabrics like denim or fleece, a bulky overlock foot may handle the edge better than a double-cord foot.
If the foot will not stay on the shank, the screw may be loose or the shank may be incompatible. Some BERNINA feet require a specific adapter. Always test on scrap before sewing the final project. For decorative stitching over cord, use an open embroidery foot like the #26 BERNINA Drop-Shaped Embroidery Foot, which gives clear visibility and navigates curves well.
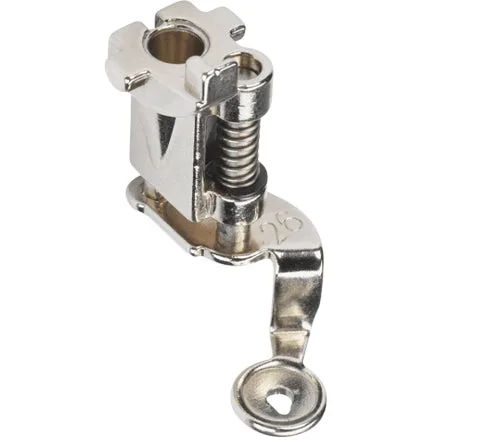
#26 BERNINA Drop-Shaped Embroidery Foot
- Keep a small brush handy to clean lint from the foot grooves.
- Replace the needle after every few hours of sewing on cord, because cord dulls needles quickly.
Step-by-step: sewing piping with a double-cord foot
- Measure and match cord to the foot: Check the cord diameter against the foot groove depth. If the cord does not sit flush, the needle will miss stitches. Test with a scrap of cord before you cut fabric. Checkpoint: the cord should slide into the groove with slight resistance, not rattle.
- Cut and wrap bias strips: Cut bias strips wide enough to wrap the cord plus your seam allowance. Fold the strip around the cord and pin or clip. Press lightly, but do not stretch the bias. Checkpoint: the wrapped cord should be smooth with no twists.
- Attach the double-cord foot and set the machine: Snap or screw the foot onto the shank. Set a straight stitch, length 2.5–3.0 mm, and a new 80/12 or 90/14 needle. Lower the needle by hand to confirm it lands beside the cord. Checkpoint: turn the handwheel toward you; the needle must not hit the cord or foot.
- Position the wrapped cord under the foot: Place each cord into its own groove with the raw edges aligned. Lower the foot and bring the needle to the starting point. Hold the threads back and sew a few stitches. Checkpoint: after five stitches, stop and check the back for loops or skipped stitches.
- Sew slowly and keep the cords parallel: Guide the fabric gently; do not pull. If the cord shifts, stop with the needle down, lift the foot, and reset. Sew in sections and check alignment often. Checkpoint: the stitching line should stay a consistent distance from both cords.
- Handle corners and joins: At corners, stop with the needle down, lift the foot, and pivot. Clip the cord seam allowance slightly to bend around the corner. For joins, overlap the ends and stitch across. Checkpoint: the corner should lie flat without a bulge; trim the cord if needed.
- Press and finish the seam: Press the seam allowance open or to one side. Trim bulk from the cord ends. If the project calls for edge finishing, switch to a bulky overlock foot or serger. Checkpoint: the piping should stand evenly with no puckers or twisted cord.
Feet and supplies that work with corded trim
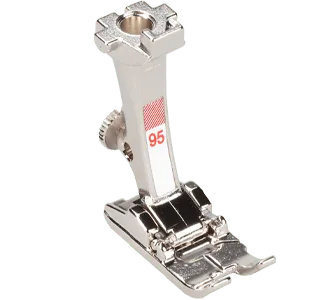
- #95 BERNINA Binder Foot: The 5.5 mm foot for Binder attachments #87 and #88; the notch at the side allows closer access to the binder attachment; for 5.5 mm and 9 mm machines. If your project uses pre-folded bias tape rather than loose cord, this foot plus a binder attachment is the correct setup. It is not a substitute for a double-cord foot, but it solves the binding step cleanly.
- #26 BERNINA Drop-Shaped Embroidery Foot: Uniquely shaped to give an unobstructed view of the embroidery hoop and stitching area; narrow drop shape makes it easy to navigate tight curves and intricate embroidery designs with precision. For decorative corded designs or curved piping, the open shape helps you see exactly where the needle lands. It is a useful alternative when a double-cord foot feels too enclosed.
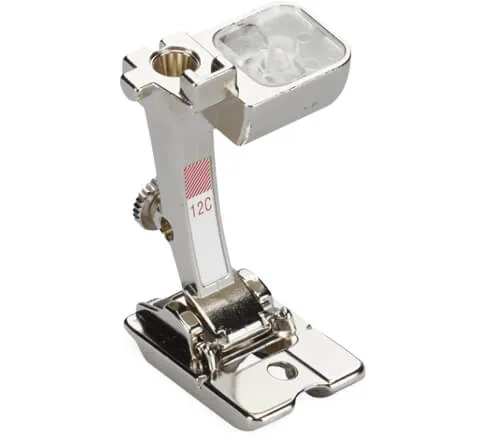
- #12C BERNINA Bulky Overlock Foot: Offers the same overlock-style edge finishing as the #12, with a clear sole for improved visibility; ideal for denim, fleece, and other heavy fabrics. When you are finishing the raw edge of heavy fabric after attaching piping, this foot gives better visibility and control than a standard foot. It is not for cord channels, but it helps with the seam finish.
- Isacord Thread 40wt 1000M – Black: 40wt, 1000 meters per spool, 100% polyester for exceptional colorfastness and durability; smooth, crisp stitches for outlines and lettering. A strong, smooth thread reduces skipped stitches and fraying when sewing over cord. The large spool means fewer changes on long piping runs.
A double-cord presser foot turns two cords into neat, parallel piping, but it only works when the cord diameter matches the groove and you sew slowly with a fresh needle. Test on scrap, keep the cords seated, and switch to a binder foot or embroidery foot when the task changes. With a little practice, corded trim becomes a reliable finish for bags, cushions, and garments.