Quick answer
To set up the AeroTech M1350W-PS DMS motor, assemble the disposable components: verify the pre-installed nozzle, install the propellant, drill the delay using the Universal Delay Drilling Tool (UDDT), then add the ejection charge.
Why choose the DMS over a reloadable system
The AeroTech Disposable Motor System (DMS) is a single-use motor kit that you assemble yourself. Unlike reloadable hardware, all components are disposable, so there is no need to clean or maintain motor cases after flight. This makes DMS a convenient option for flyers who want a high-power 75mm motor without the upfront cost of reloadable hardware.
The trade-off is that you must carefully follow assembly steps—especially delay drilling and ejection charge preparation—because any mistake means replacing the entire motor. With a reloadable system, you can reuse the hardware and only replace the propellant and consumables.
Step-by-step assembly instructions
- Inspect the nozzle and motor tube: Check that the nozzle is already installed and seated correctly. Inspect the motor tube for any cracks or debris. If the nozzle is loose or the tube is damaged, do not proceed—contact your supplier for a replacement. A damaged nozzle or tube cannot be repaired; the motor must be replaced.
- Install the propellant grain: Slide the propellant grain into the motor tube with the forward closure facing the top. Ensure it is fully seated against the nozzle. Do not force it—if resistance is excessive, check for obstructions. The grain must be snug but not jammed; a gap can cause uneven burn or pressure spikes.
- Drill the delay using the UDDT: Insert the Universal Delay Drilling Tool (UDDT) into the delay element at the top of the motor. Drill to the depth specified in your motor data sheet for your desired delay time. Common mistake: drilling too deep shortens the delay and can cause early deployment; too shallow delays deployment. Always double-check the delay depth chart for your specific motor and altitude conditions.
- Add the ejection charge: Pour the supplied ejection charge powder into the cavity above the drilled delay. Do not overfill—use the amount specified in the instructions. A common error is adding too much powder, which can over-pressurize the recovery system. Measure the powder carefully; excess can damage your parachute or shock cord.
- Seal the motor and final check: Install the forward closure (if provided) or the tape seal per the kit instructions. Verify that all components are secure and that the motor is ready for installation in your rocket. Perform a continuity test on your igniter before flight. A loose seal can cause ejection gas leakage, reducing deployment reliability.
Product facts
-
AeroTech M1350W-PS 75mm x 638mm Single Use DMS 1-Motor Kit - 13135P: The AeroTech Disposable Motor System DMS is a single-use motor in kit form assembled by the user. The nozzle is already installed; propellant needs to be installed. You will need to set the desired delay time using the Universal Delay Drilling Tool (UDDT), not included, then pour in the ejection charge. This means you must have a UDDT on hand before starting assembly, and you are responsible for drilling the correct delay and adding the ejection charge—steps that directly affect flight timing and recovery deployment.
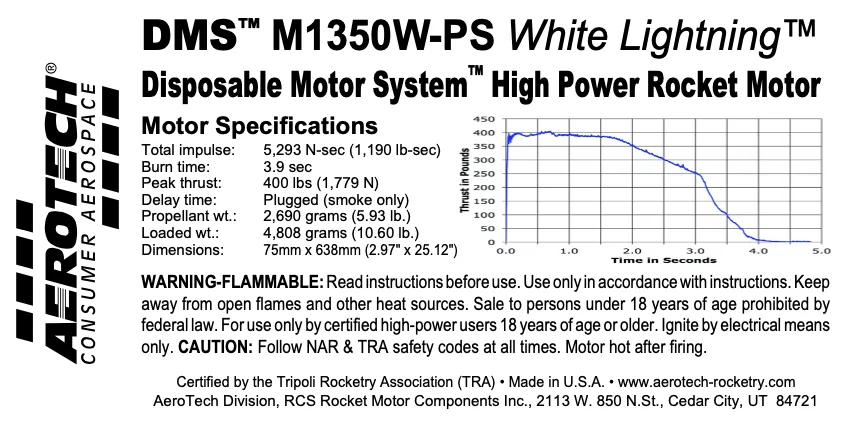
AeroTech M1350W-PS 75mm x 638mm Single Use DMS 1-Motor Kit - 13135P